Centos7.x安装opensips并实现通话成功

背景

先是使用opensips官方的docker尝试,好不容易装好了,软电话(sipphone)上注册不成功,主要是我docker又是装在VirtualBox的虚拟机里的,网络结构致使调试困难,直接新开一个虚拟机,很顺利的就安装成功并且实现局域网终端之间通话。

准备工作

安装依赖

1
yum install mysql mysql-server mysql-devel gcc gcc-c++ ncurses-devel flex bison -y

机器上已经又mysql正常运行的话就跳过mysql相关的安装了。
注意在安装mysql-server的时候可能会出现找不到包,提示使用mariadb-server替代,那就老实使用yum install mariadb-server mariadb安装吧。

mysql 设置密码并打开远程访问权限

装好的mysql启动默认是没有密码的,进入mysql后进去运行下面的代码。

1
2
3
4
5
6
// 设置密码
set password for 'root'@'localhost' =password('123456');
// 设置远程访问及全表权限
grant all privileges on *.* to root@'%'identified by '123456';
// 更新权限
flush privileges;

这里的设置根据需要来就好了。

开启防火墙5060端口

1
2
firewall-cmd --zone=public --add-port=5060/udp --permanent
firewall-cmd --reload

安装opensips

下载源码并选择模块

1
2
3
4
5
6
cd /usr/local/src 
git clone https://github.com/OpenSIPS/opensips.git -b 2.4 opensips-2.4
cd opensips-2.4
make all
# 如果这里报错,停止,装好依赖再make all
make menuconfig

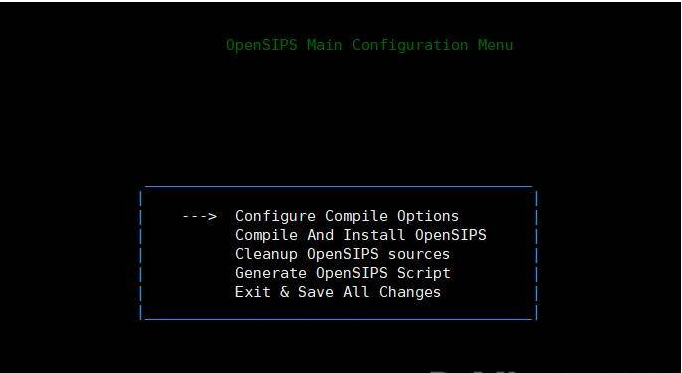
进入这个菜单后,根据需要使用这个工具(左右键进入返回,空格键选中,回车键确定),但有个必须的是进入Configure Compile Options,选中db_mysql保存,返回主菜单选择Compile And Install OpenSIPS编译安装即可。完成后会回到这个界面,保存退出。

修改配置文件

1
2
3
4
5
6
7
8
9
10
11
12
13
14
15
16
17
18
19
20
21
22
23
24
25
26
27
28
29
30
31
32
33
34
35
36
37
38
39
40
41
42
43
44
45
46
# 配置文件目录
ls /usr/local/etc/opensips/

opensips.cfg opensipsctlrc osipsconsolerc scenario_callcenter.xml

# 运行程序目录
ls /usr/local/sbin

opensips opensipsctl opensipsdbctl opensipsunix osipsconfig osipsconsole

# 修改配置
vim opensipsctlrc

# 修改后的配置
# $Id$
#
# The OpenSIPS configuration file for the control tools.
#
# Here you can set variables used in the opensipsctl and opensipsdbctl setup
# scripts. Per default all variables here are commented out, the control tools
# will use their internal default values.
## your SIP domain
SIP_DOMAIN=192.168.0.191
## chrooted directory
# $CHROOT_DIR="/path/to/chrooted/directory"
## database type: MYSQL, PGSQL, ORACLE, DB_BERKELEY, DBTEXT, or SQLITE
## by default none is loaded
# If you want to setup a database with opensipsdbctl, you must at least specify
# this parameter.
DBENGINE=MYSQL
## database port (PostgreSQL=5432 default; MYSQL=3306 default)
DBPORT=3306
## database host
DBHOST=localhost
## database name (for ORACLE this is TNS name)
DBNAME=opensips
# database path used by dbtext, db_berkeley, or sqlite
DB_PATH="/usr/local/etc/opensips/dbtext"
## database read/write user
DBRWUSER=opensips
## password for database read/write user
DBRWPW="opensipsrw"
## engine type for the MySQL/MariaDB tabels (default InnoDB)
MYSQL_ENGINE="MyISAM"
## database super user (for ORACLE this is 'scheme-creator' user)
DBROOTUSER="root"

这里主要是mysql连接信息,保证能正常连接即可。还有一个SIP_DOMAIN能连接到本服务的域名或者IP地址即可。

修改opensips.cfg

1
2
3
4
vim opensips.cfg

# 修改配置项
listen=udp:192.168.0.191:5060 # CUSTOMIZE ME

这里如果你不确定该怎么填的话,运行下面的命令看一下,一般是本机IP

1
ip route get 8.8.8.8 | head -n +1 | tr -s " " | cut -d " " -f 7

创建数据库

1
2
3
4
5
6
7
8
9
10
11
12
13
14
15
16
17
18
19
20
21
22
23
24
25
26
27
cd /usr/local/sbin

opensipsdbctl create
……
INFO: creating database opensips ...
INFO: Using table engine MyISAM.
INFO: Core OpenSIPS tables successfully created.
Install presence related tables? (Y/n): y
INFO: creating presence tables into opensips ...
INFO: Presence tables successfully created.
Install tables for
b2b
cachedb_sql
call_center
carrierroute
cpl
domainpolicy
emergency
fraud_detection
freeswitch_scripting
imc
registrant
siptrace
userblacklist
? (Y/n): y
INFO: creating extra tables into opensips ...
INFO: Extra tables successfully created.

之后就是根据提示傻瓜操作创建数据库就好了,如果前面的mysql环境没装好,数据库连接有问题,这里就会报错,如果提示类似下面的编码问题,输入latin1即可。

1
WARNING: Your current default mysql characters set cannot be used to create DB. Please choice another one from the following list:

这一步完成之后,会在数据库新建一个opensips(名字是在上面的配置文件里设置的)的数据库。

启动opensips

1
2
3
4
5
6
7
8
9
10
11
12
13
14
15
16
17
18
19
20
# 启动
[root@localhost sbin]# opensipsctl start
INFO: Starting OpenSIPS :
INFO: started (pid: 26051)
# 查看opensips进程
[root@localhost sbin]# ps -aux | grep opensips
root 3504 0.0 0.4 70536 4420 ? S 3月07 0:00 /usr/local/sbin/opensips -P /var/run/opensips.pid
root 3505 3.1 0.1 70776 1368 ? S 3月07 12:35 /usr/local/sbin/opensips -P /var/run/opensips.pid
root 3506 0.1 0.0 70536 476 ? S 3月07 0:29 /usr/local/sbin/opensips -P /var/run/opensips.pid
root 3507 0.0 0.0 70536 688 ? S 3月07 0:08 /usr/local/sbin/opensips -P /var/run/opensips.pid
root 3508 0.0 0.2 70536 2396 ? S 3月07 0:03 /usr/local/sbin/opensips -P /var/run/opensips.pid
root 3509 0.0 0.1 70536 1424 ? S 3月07 0:01 /usr/local/sbin/opensips -P /var/run/opensips.pid
root 3510 0.0 0.1 70536 1912 ? S 3月07 0:01 /usr/local/sbin/opensips -P /var/run/opensips.pid
root 3511 0.0 0.2 70536 2392 ? S 3月07 0:01 /usr/local/sbin/opensips -P /var/run/opensips.pid
root 3512 0.0 0.1 70536 1164 ? S 3月07 0:01 /usr/local/sbin/opensips -P /var/run/opensips.pid
# 注册用户格式 opensipsctl 用户名 密码
[root@localhost sbin]# opensipsctl add 1001 1001
new user '1001' added
[root@localhost sbin]# opensipsctl add 1002 1002
new user '1002' added

到这里就成功的启动了服务并添加了两个用户(1001,1002),下面我们来在局域网测试一下。

测试通话

在同一个局域网的手机上装上支持sip的软电话应用市场搜sip phone应该能找到不少,电脑端也有。
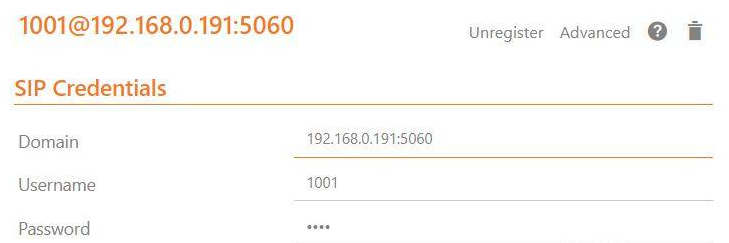
配置一般是这样的

拨打电话成功

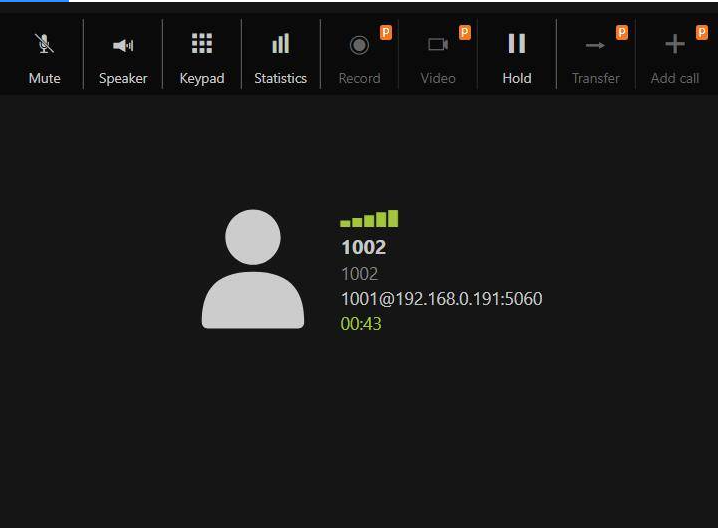
配置好两个终端直接拨号就行了,号码就是1001,1002,经测试视频通话也是默认就支持的,很6哦。至此,借助opensips实现sip通话已经完成,只是实现最基本的功能,opensips还有很多好用的功能供大家来挖掘。

-------------本文结束感谢您的阅读-------------

本文标题:Centos7.x安装opensips并实现通话成功

文章作者:豌豆多多

发布时间:2020年06月23日 - 10:06

最后更新:2020年08月04日 - 14:08

原始链接:https://wandouduoduo.github.io/articles/a63421f.html

许可协议: 署名-非商业性使用-禁止演绎 4.0 国际 转载请保留原文链接及作者。

原创技术分享,您的支持将鼓励我继续创作